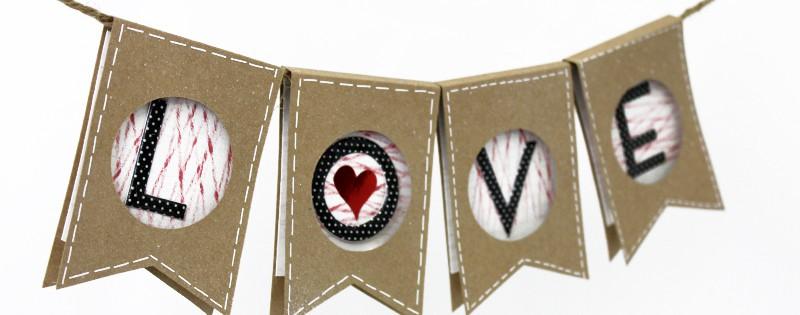
{Valentines} 3D Pennant Banner – Part I
Using my 3 craft room must-haves from my earlier post (see post here), I made this lovely 3D paper pennant banner!
Pennants and banners are all the rage lately but I wanted to add a little twist…
something different… so I made it 3D!
Here’s how…

Start by cutting out 4 equal strips of Kraft Cardstock, one strip for each letter or the word you’d like to make. The width of the strips is up to you depending on how big or small you want the banner to be. My strips are about 2.75″ wide with a 2″ circle. I cut my strips from an 8.5×11 piece of Kraft Cardstock so the length of my strips was 11“.

Next I decided how long I wanted my pennant to be. I decided on 4.5″. Before punching the circle, or cutting out the pennant shape on the bottom I first scored and cut each strip to size.
Placing my strip onto my scoring board I made a scor mark first at 4.5″. Then I made my next scor mark .25″ further (this will be the 3D width of your banner). Then from that scor mark I measured another 4.5″ and made a mark to trim my paper (this is the other end of the pennant).

Using scissors I simply cut out a triangle from the bottom of the paper to create a pennant shape. If you want to be precise, you can measure to the center and exactly how deep you want to cut the pennant before cutting.


To match the pennant on the other end, I simple folded the paper over, matched up the ends and traced my first cut. Then using a scissors, cut out the other pennant shape and you should have two ends that match!

Then I folded my scor marks and flattened them with my bone folder. Then using a 2″ Circle punch, I punched the circle as ‘centered’ as I could get it.

Next I chose a white textured paper for the backdrop of my circles and, using an adhesive runner, adhered it to the back inside of my 3D pennant.


To add some fun details I added DoodleBug Designs Rub-on Sew Easy Stitches around the boarder of each pennant. The white stitch on the Kraft Cardstock really pops and adds a fun ‘handmade’ look.

To adhere my pennant together I used my Megan Elizabeth 3D foam Sheets from her Adhesive Pack. Since my pennant was .25″ deep I double stacked my foam pieces.

You can use pop dots or whatever dimensional adhesive you would like for this part. You only need a small square, and make sure not to put it too close to the edge so once you lay the top down, you won’t see the adhesive at all.

Lining up the pennants as best as you can, stick the top of the banner onto your adhesive and press down firmly.

There you have it – a 3D pennant banner! Stay tuned for Part II where I finish the banner and share a little tip & trick on making your own homemade twine background stamp!
WHAT DO YOU THINK?
{Comment below –> I love hearing your feedback}
Happy Crafting,
Abbey
FEATURED SALES