
Bee-utiful Spring Card Tutorial – Part I
Happy Valentines Day! Speaking of LOVE…
Just recently I have fallen back in love with Pinterest. Pinterest and I have a love/hate relationship lately. Some days I love it and pin a million and one ideas, and some days I just…don’t. Well earlier this week I made a Pinterest Inspiration Cork Board and this is what came of it…

For this card I wanted to combine a few different ideas, patterns and colors that I have had floating around in my head lately…
1. Black/white/blue/yellow color combination
2. Bee themed
3. Hexagons
4. Washi Tape & Chevron (too bad I don’t have chevron Washi Tape)

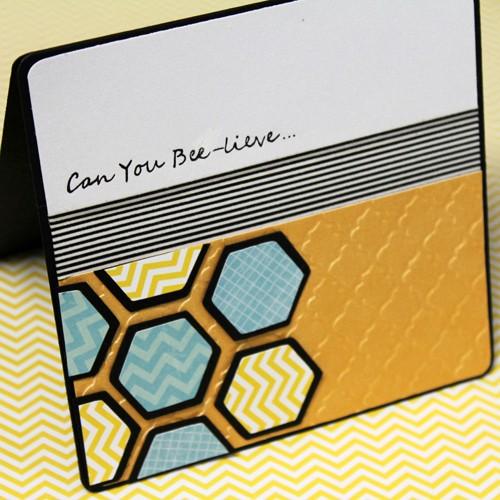
The base of my card is a solid black 5×5 square topped with a slightly smaller white square, both using American Craft Cardstock. Making the card square added to the overall modern Geo-feel.
I rounded all of my corners with a simple Corner Rounder Punch.

For the bottom half my card I used an absolutely stunning piece of gold shimmer paper from the DCWV Coral Couture Cardstock Stack. Using my Cuttlebug Machine and my favorite Quatrefoil Embossing Folder, I added some background texture.

Next, I added a strip of Black & White Stripe Washi Tape along the top of my embossed paper. The contrast against the gold and white paper really made it POP!

Using my Cricut Expression 2 Machine and the Accent Essentials Cricut Cartridge, I cut out 6 solid black hexagons at 1.3″. I wasn’t quite sure how to lay these so I cut and layed them out to create this pattern first, then adhered them with my tape runner.

Then I cut out 6 more hexagons, just slightly smaller at 1.1″ in some fun blue and yellow patterns. The yellow and blue chevron paper are both from the Bella Blvd Birthday Girl Collection and the blue line pattern paper is from the Echo Park Summer Days Collection.

I didn’t have a stamp that said what I needed so I was going to hand write out “Can You Bee-lieve…” but I have absolutely the worst handwriting…
Instead of attempt to write neat, I instead used a simple technique to copy and hand write any font flawlessly.

By using this little tip & trick I was able to choose a fun cursive font and add my sentiment to the card. It is still handwritten but so NEAT and looks great!

Here is my final front of the card. I have some un-bee-lievable (had to throw in that pun somewhere) plans for the inside of the card so stay tuned and I hope you love the card so far!
I love to hear your thoughts, so comment below and tell me what YOU think!
FEATURED SALES


