Felt & Paper Pinwheel Project Tutorial
So the other day I was fully sucked into the land of Pinterest and looking for some fun and new crafts to try and came across a few projects with felt! I was hooked and totally determined to craft with felt!

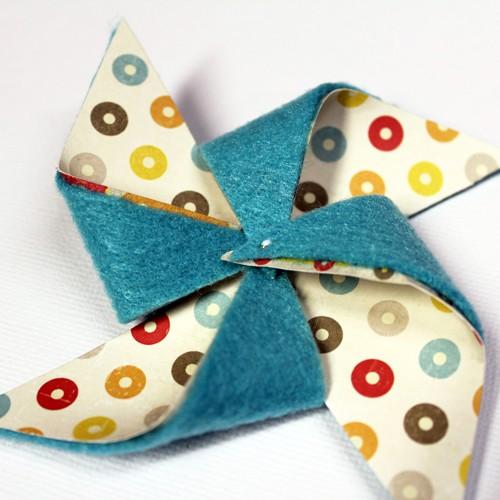
This is what I came up with: Felt & Scrapbook Paper Pinwheel…
Use it on a wreath, as a pin, as a boutonniere, add it to a headband, a backpack, or use it as…oh…a pinwheel? Oh the possibilities of this bright and playful little pinwheel!
So I went on a craft haul and came home with some beautiful bright bluish turquoise felt. I wanted to set this felt project apart by adding a fun twist of color so I decided to ‘back’ my felt with a fun circle paper from the brand new My Minds Eye Boy Crazy Collection!

I love the geo-funky feel of this line and the boyish colors are super fun. Let’s be honest, I craft pink way to much! When your life revolves around a 1 year old princess, it happens!

Start by cutting out two squares the exact same size, one felt, one paper. Next, using Spray Adhesive, spray the backside of your paper and stick it to your felt. This is not a permanent bond, it’s just a little something to keep the paper and felt together and lined up as you are cutting.

I used a pretty good amount of spray adhesive and rubbed the felt down firmly to secure the hold.
*Tip: I do all of my adhesive spraying in a spare box. Spray adhesive tends to get on everything so keeping it contained works well.*

Next using a very sharp (this is key) pair of scissors, cut four slits from each corner towards the center of the square. Do not, I repeat, do not cut all the way to the center! Stop just short on each cut leaving a solid center.

Here is what the back side looks like. Your cuts don’t have to be perfect, but the sharp scissors does help a lot. If your scissors are not sharp you will just ‘fuzzify’ your felt and your felt cuts will not look very nice.

Next comes the sewing…
Wait… WHAT!?
Yes, there is a tiny bit of sewing involved, but no worries! I am the worlds worst sewer, and if I can manage a few stitches, so can you!

I used a fairly large sewing needle seeing as the felt is a bit thicker. For thread I used my white and gold twine. DMC Floss would work well with this part too.
On one end or your twine string make a big ugly knot (heard that term on a crafting show once) by knotting the twine 2 or 3 times over. Leave a little tail thread on the knot, we will use that later. Thread the remaining end trough your needle.
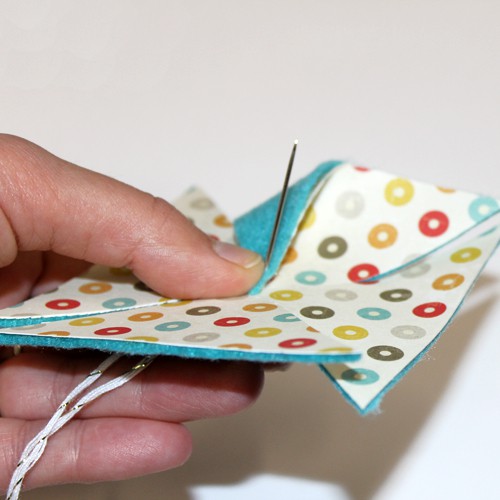
Right in the smack center of your pinwheel where we did not cut, poke your needle halfway though the back side. Don’t pull the needle all the way through!

Folding in the corners of your ‘pins’ stick them one by one onto your needle. Once you’ve got all four on, pull your needle through. Pierce your needle back through to the back side to create one small stitch like seen below.

Once on the back side cut off your twine and tie a knot using the tail piece that we left on your knot from earlier. Make sure to tie these as close to the felt as possible. If it is loose your pinwheel will come slightly undone.

Well, there you have it! A super simple and fun way to create a fun pinwheel with a pop of color!
I used a sewing pin in the center of mine and stuck it on a yarn wrapped foam wreath that I am in the progress of finishing. (details on that one later)

I hope you are super inspired to go out and buy some felt! Make sure to stop by our Pinterest Page and follow our new Felt Crafting Board!
What do you think?
I love to hear your thoughts so make sure to leave a comment below!
Happy Crafting,
Abbey
FEATURED SALES