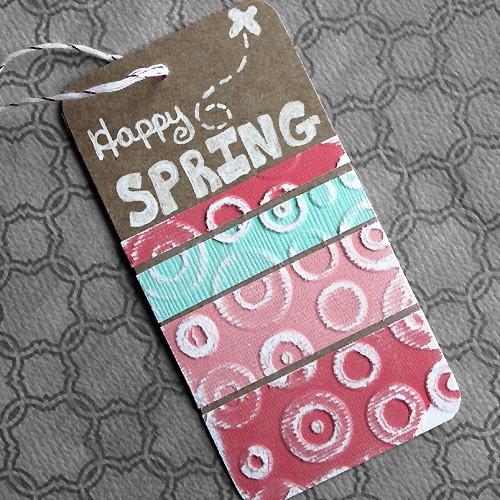
Tuesday Tutorial: Spots & Dots Spring Tag.
Happy Tuesday everyone!
Here’s a quick and simple way to whip us a one-of-a-kind gift tag in no time!

For this tag, I am recycling my Silhouette Adhesive Backed Cardstock paper scraps I had from last weeks Bunny Easter Card. I loved the light blue/coral/pink combination and I hate to waste this beautiful paper!

First, cut out a Kraft Cardstock rectangle to whatever size you’d like your tag. Round all four corners with a Corner Rounder and punch a hole in the top center. Next, trim your Silhouette Adhesive Cardstock strips down to size. For this tag, I wanted each color to be a different width, so I cut each strip a bit skinnier than the next making sure all of them were just a hair wider than my tag.

Using my new Cuttlebug ‘Spots & Dots’ Embossing Folder that I just got this weekend (LOVE it!), I layered the strips out and lined them up to match perfectly.

Carefully close the folder so the pieces stay lined up.
Here’s how it should look…

Run it through your Cuttlebug Machine (or whatever machine you prefer.)

Now simply peel the backing off of the embossed strips and stick them on your tag.


I started with the thickest strip at the bottom and continued to the skinniest strip on top leaving just a slight break between each strip.

Here’s how the back looks. The adhesive on the paper is really strong and works great, no messy adhesives or glue required!

Next, trip off your excess paper using a scissors. Using a corner rounder, once again round the bottom two corners of your tag to trip the excess paper.

Now for the fun part! Taking a piece of fine grit sand paper and lightly rub over the embossed paper on your tag. You will start to see that where the raised ‘spots & dots’ are, the paper with rub off and leave a fun distressed pattern.

I used this same sandpaper technique for the background of a Valentine’s Day Card this year and really love the look!
Be careful to start rubbing lightly. The Silhouette Adhesive Backed Paper is pretty touchy and the color comes off quickly!

Using a White Gel Pen, I added ‘Happy SPRING’ and a little butterfly. You can add whatever you’d like, or nothing at all!

There you have it! A very simple and one-of-a-kind spring gift tag! Add this tag to a present, gift box, or even an Easter Basket! The project from start to finish took about 5 minutes, and it would be a very easy project to duplicate and make multiple at once!
Do YOU add personalized gift tags to your gifts or Easter baskets?
Hope you loved the idea! I’d love to hear your thoughts!
Happy crafting,
Abbey
FEATURED SALES