Make A Card Monday. 3 Cards In 10 Minutes Or Less!
Oh Monday…how you come so quickly!
This weekend was all about birthdays! Our lovely Craft-e-Corner designer Kala turned the big 30! (She might kill me for saying that) She still says she is 25 and 6 months…I wonder how long that will last for? :::wink wink:::
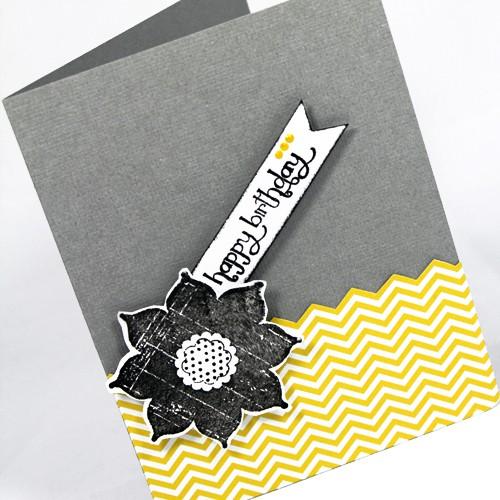
Here is a quick card I made for her birthday in less than 10 minutes!

- Take a piece of chevron patterned paper (from the Birthday Girl Collection) and cut along the zig zag line on the top. Adhere it to the base of your card and trim any excess paper.
- Round the two outer corners of the card
- On white cardstock, stamp a flower in black ink. Cut out the flower stamp with scissors and, using a pop dot, pop it off of your card.
- By hand cut out a small white pennant flag shape and ink the edges with a 1:00am black Ink Edgerz.
- Stamp ‘Happy Birthday” on your pennant and, using a pop dot, slide one edge under your flower.
- Add a few pearl accents with a Viva Sunny Yellow Pearl Pen.
Isn’t is cute? The right combination of simple colors and patterns can make a big statement! I love the modern feel of this card and is was super easy to create! A big Happy Birthday to Kala!
Today also marks another special day, my nephews golden birthday! The little bugger is 8 today! Happy birthday to my wonderful & crazy nephew Alex! Here is another quick birthday card that is a bit more masculine and would make a great card for a little boy!

For this card I challenged myself to use the Mother’s Day Bouquet Cricut Cartridge (This cartridge is about as girly as it gets!) and create a masculine card. Card time: 10 minutes!

The first step to making a masculine card is having the right colors and papers. The bright red polka dot paper and plaid patterned paper are both from the Craft-e-Corner exclusive Megan Elizabeth ‘Man’ Mustache Kit! To create the 3D candles, I hand cut a few skinny rectangles and popped them off the page. For the flames of the candle, I used a leaf shape found on the Mother’s Day Bouquet Cartridge! The burst shape also comes from this cartridge.
This just proves that even a “girly” flower cartridge can be used for masculine projects, you just have to use your imagination!

Next us is a Thank You card made with the same Mother’s Day Bouquet Cartridge! This time is was all about the frills and flowers!
For the background I added texture by using my CuttleBug Embossing Machine and a Wood Grain Embossing Folder. To make the flower I chose one of the flower shapes and cut 4 different sizes of the same design. ( 3″, 2.7″, 2.5″, 2.3″)
The best part about this cartridge is you don’t have to create one specific flower or shape, you can mix and match the flower designs to create hundreds of different flower designs!
For some finishing touches and a bit of sparkle I added a few Megan Elizabeth Sparkle Lights to the center of my flower! A few White Gel Pen swirls and a “Thanks” pennant and this card was complete!
All three of these cards took 10 minutes or less and are very easy to re-create! I used a combination of my favorite products and papers and I hope you are inspired to start creating!
WHICH CARD IS YOUR FAVORITE & WHY?
FEATURED SALES