Ink & Emboss Grunge Chic Polka Dot Card
Hi guys! Abbey here. For today’s post I am going to share with you a “grunge chic” card I made for my (soon-to-be) 5-year-old niece, Bella.

Right about now you are probably thinking, what in the world is grunge chic?
Well, grunge chic is a mixture of funky distressed and splattered ink combine with bits of pink, purple & shine! (Yes, I know it sounds crazy, but I am sticking to it!)
Well, grunge chic is a mixture of funky distressed and splattered ink combine with bits of pink, purple & shine! (Yes, I know it sounds crazy, but I am sticking to it!)

Let’s get started!
For my card, I started out with an A2 Kraft Cardstock base.
For my card, I started out with an A2 Kraft Cardstock base.

Using my Cuttlebug Machine, I partial-emboss the top of my card. Partial embossing is where you arrange your embossing plates accordingly so that only a portion of your card is embossed. To do this, stick your entire card into your embossing folder like normal.

Now place your embossing folder on to your base plate. For your top ‘covering’ plate, you will want to only cover the area you want embossed. Normally you would sandwich your plates to all line up accordingly with the top plate covering the entire embossing folder, but with this technique, your top plate will hang over the edge of the other plates.

Here is the result!
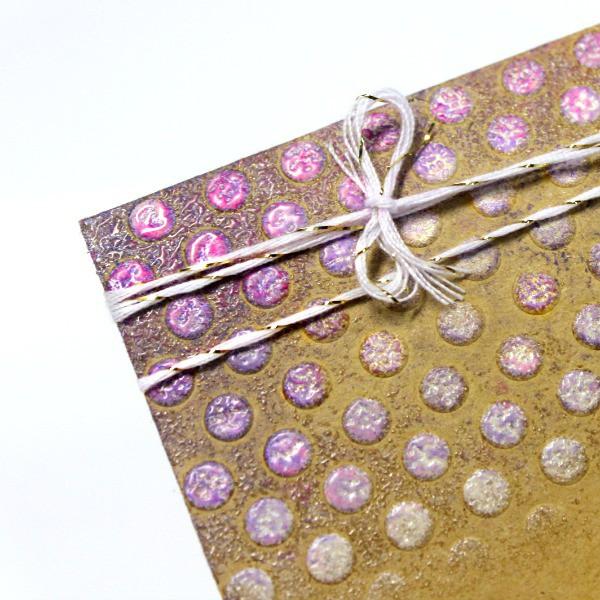
Next, I took my Tsukineko White Ink Pad and dabbed my entire ink pad over the raised polka dots. Cover the inked area with clear embossing powder and hit it with a heat gun.

To create a fun grunge look I took a piece of paper towel and scrunched it up. Using the paper towel I dabbed my ink pad and then dabbed over my embossed polka dots. The white enamel embossed dots underneath the ink really created a cool 3D pop!

Since this card is for a little girl, it was only fitting that I used pink and purple ink. I used my Megan Elizabeth Ink Edgerz in Party Girl Pink and Lush Purple.
TIP: Hit your ink with the heat gun to help it dry quicker!

Using my 1.5″ Circle Punch, I punched out a circle and added white gel pen stitching around the outside. On the inside of the card, in the center of the punched circle, I stamped a 5 in the same white ink. I added some Tsukineko Sparkle Embossing Powder for a little bit of shine.
Hit is with the heat gun and watch it sparkle!

Using my white gel pen once more, I traced the very inside of my punched circle.
(The circle was actually on the inside of the card)

To finish off the inside of the, card I made my white gel pen circle into a balloon!

Last but not least I topped off the card with a few wraps of white and gold sparkle twine and tied a bow! What is a card for a little girl without some sparkle and a bow?

I love how the card turned out! The grungy pink and purple polka dots give it a fun look and even add a bit of texture. The sparkly 5 and glitter twine make it super chic…
…and that is how you get grungy chic!

Don’t be afraid to play with different textures, colors and mediums on your cards or paper crafts. Just think of your craft room as your playground and become a 5-year-old again and PLAY!
I hope Izabella loves the card and I can’t wait to give it to her next week!
Have a fabulous crafty day!
-Abbey-
Please comment below. I love hearing what you all have to say!
FEATURED SALES