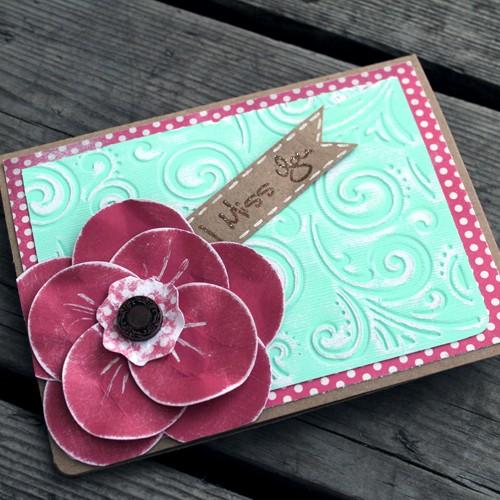
Simple Circle Punch Flower Card Tutorial & Distressing Techniques
Hello and HAPPY TUESDAY!
I Thought today was a perfect day for a ‘Tuesday Tutorial’ flower card!
Let’s get started!
I started out with a standard A2 size Kraft Cardstock card base and rounded the bottom 2 corners. Next, I then added a rectangle just smaller than my card base using the pink polka dot side of the Love Me Banners Paper. I also rounded the bottom two corners to match my card base.

The adhesive I used on the entire card is the American Crafts This To That Adhesive Runner 3-Pack
I love this 3 pack because it comes with 3 different types of adhesive that are all permanent and super strong! The runners are small, compact and easy to use. I used the solid adhesive for this card.

For the next layer on the card I used one of my favorite distressing techniques! For this technique I used mint green paper from the Silhouette Spring Adhesive Backed Cardstock Pack.

You can use other paper, but I do highly recommend this paper because unlike other papers, it is thick and has a white core, has a slight texture, is fully backed with adhesives (so you don’t need any additional adhesive), and the the colors are fabulous!

I cut an A2 size rectangle of the mint color and ran it through my Cuttlebug Embossing Machine using a Flourish Embossing Folder.

Once my paper was embossed I lightly sanded it with a fine grit sanding block. Since this paper has a white core and a slight texture, the sanding effect turns our really nice. You can sand as little or as much as you want.
TIP: Sand lightly. You can always sand more and the color sands off pretty easily, so you don’t need a lot of pressure.

I trimmed it down to size, rounded the bottom two corners to match the other layers, and adhered it to my card.

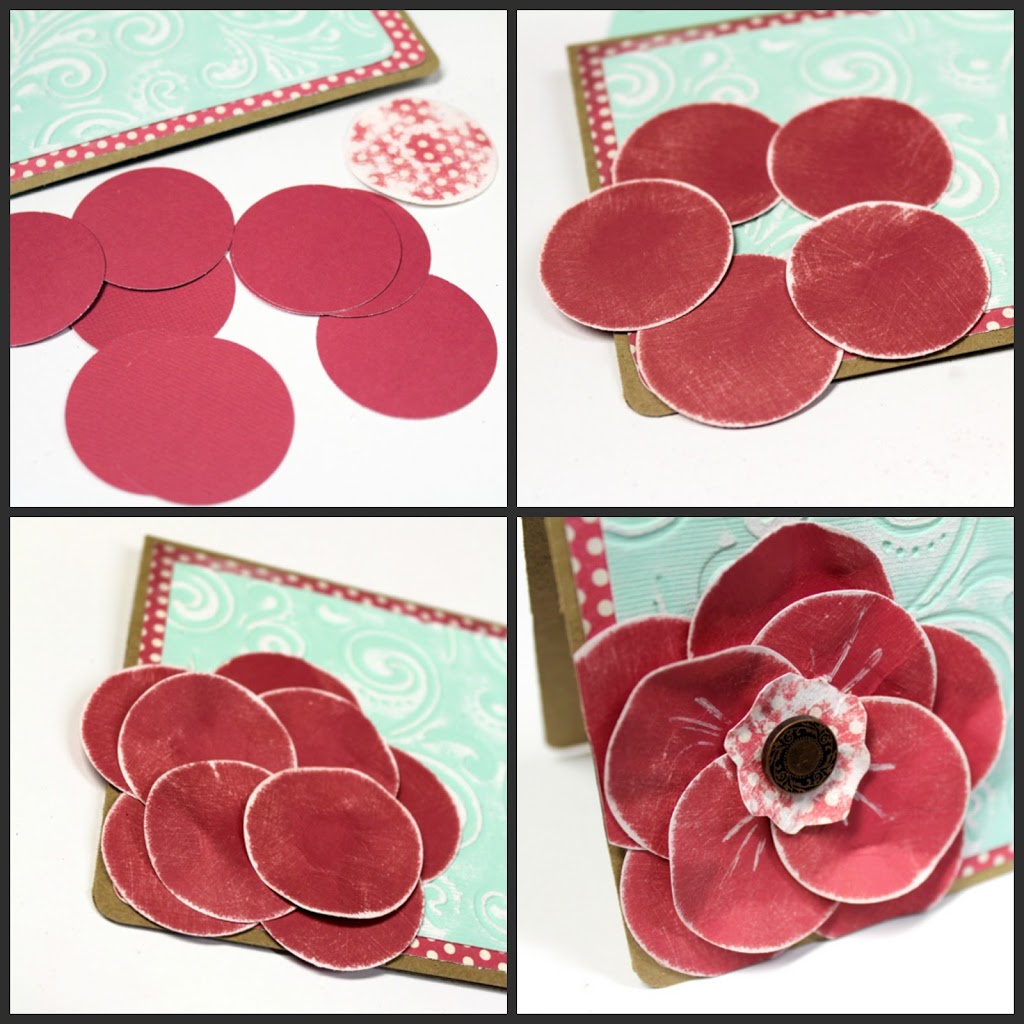
Next using my 1.5″ Circle Punch, I punched one circle from my Love Me Banners Sheet, and 9 more circles from a coral sheet of cardstock from the DCWV Coral Couture Cardstock Stack.

Using the same fine grit sanding block, hold a paper circle between your thumb and pointer finger and sand the edge of the circle outward. Rotate the circle in your finger as you sand the edges.

Once you are happy with the amount of sanding and distressing on each circle you can start to adhere them to your card. I started out with 5 circles for the bottom of my flower. A few petals did hang over the edge of the card, but no worries, you can trim those later!

I then added the additional 4 circle petals on top. I used my American Crafts Solid Adhesive Runner for adhering all of my petals.

For the center, I trimmed my distressed polka dot punched circle and added a brass brad. Using a piercing tool, pierce through the center of your circle and flower and add a brad.
TIP: You can use a gem, button or embellishment rather than a brad to personalize your flower to your liking!

I used a Brass Brad from the Bo Bunny Camp A Lot Brad Set. The antique look of the brad went well with the distressed and vintage look of the flower.

The card needed a sentiment so I decided to add a Kraft Cardstock Pennant coming out of the flower.

Just recently I have been dipping my toes into heat embossing and have been trying a few different combinations of powders & inks. For my sentiment I used the VersaMark Watermark Pad and a clear Sparkle High Quality Embossing Powder.

TIP: I have found that QUALITY is key with embossing. The better quality the Ink and Embossing Powder, the better your end result will be. Many crafters will tell you that Tsukineko/Imagine Crafts VersaMark Inks, Ink Pads, & High Quality Embossing Powders are their. favorite, and I have found them to be mine as well!
As simple as it is, I love the watermark embossed look. Rather than having color, all you see is a clear coating where the embossing powder, and in this case when you move the paper around it has sparkle!

I trimmed off the edges of the petals hanging over the edge of the card and that meant the card was complete!

All in all the card turned out beautiful. The combination of distressing, dry embossing, heat embossing, and adding a touch of sparkle the card was just enough to make the card perfect.

Last thought, If you want your flower to have a bit of dimension just use your fingers and fold and bend the petals a bit. This will make the flower more realistic. You can add a few small White Gel Pen lines to the center of your flower as well.
There you have it! A simple way to use a circle punch and a few fun techniques to create something fabulous! Hope you all loved the card and tutorial.
Have a fabulous day and happy crafting!
WHAT DO YOU THINK?
*Comment below with your thoughts, I love seeing your thoughts!*
-Abbey-
FEATURED SALES