
The Perfect DIY Party Host Gift With A BANG!
Hello! Thanks for stopping by.
Today I will share a short Tuesday tutorial on how to make a simple and fun housewarming gift with a ‘bang!’ All you need is a yummy bottle of wine, a hammer, and some creativity.

Let’s get started…

First start by decorating a hammer. I found this hammer with a wooden handle at my local Goodwill store for $3. Start by sanding down the wooden handle to prep for some colored paint.

I wanted my hammer to be a tealish blue/green color so I mixed a combination of blue, white, and lime green acrylic paint.

Using a simple flat tip paint brush, paint on one thick coat.
Set aside the hammer to dry. While the hammer is drying, move onto your tag…

For my tag, I used a pre-designed tag out or a We R Memory Keepers Albums Made Easy tag book. I rounded the corners of the tag and adhered it to a piece of white wood grain patterned paper.

Using a combination of grey, brown and black Megan Elizabeth Ink Edgerz, I inked and distressed the outside of my tag.

Next, using my Cuttlebug Embossing Machine and a set of Cuttlebug Leaf Dies, I cut out a few autumn leaves in various patterned papers.

I chose my three favorite leaf shapes of the four from the set and used those. The dies worked like magic and make super crisp and clean cuts!

Once my leaves were cut, I inked the edges using the same Megan Elizabeth Ink Edgers. Next, using my piercing tool, I pierced through all three leaves and tied them all onto my tag using a thin cream May Arts Cording.
Once my cording was strung through, I pierced another hole and pulled my cord back through to the front to tie a bow.

Using a Brad Piercing Tool I curled the ends of the ribbon. Depending on what type of ribbon you use, you may or may not be able to do this. The May Arts Cording is a more stiff ribbon and therefor tends to mold and curl well.
Now that the tag is complete, it’s time to finish up our hammer…

Once the paint on your hammer is fully dried, take a piece of fine grit sand paper and rub/distress the handle until some of the wood shows through.
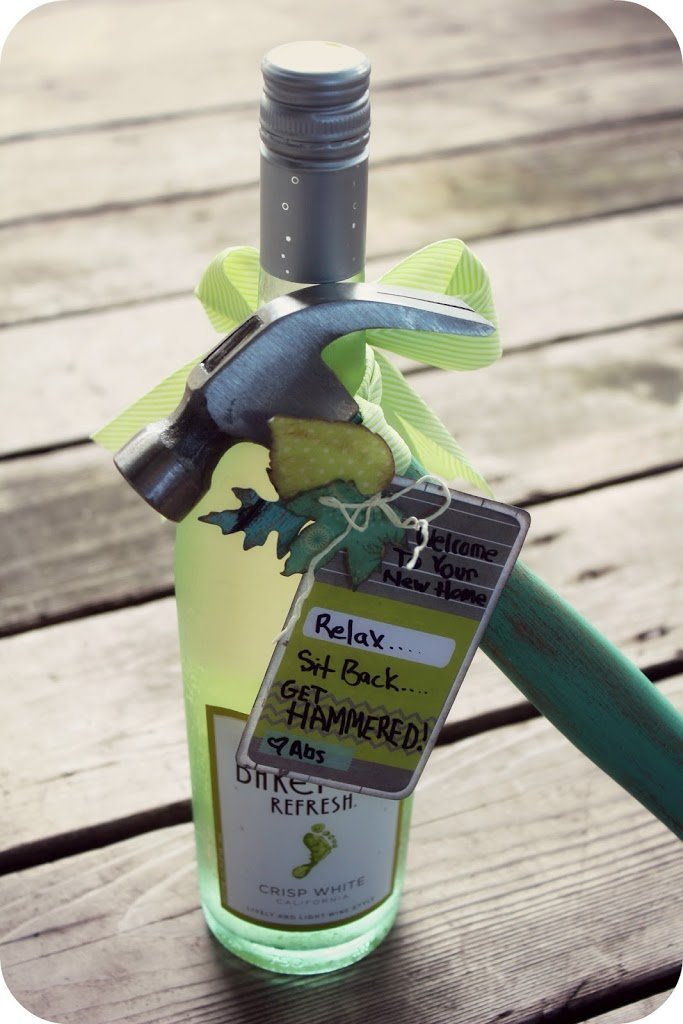
Next, tie a ribbon of choice around the hammer head base and tie a knot. Next, make another loop about the size of your wine bottle top and tie a bow on the outside.

Attach your tag to your hammer using a other small piece of cording and write your message.
Welcome To Your New Home.
Relax…
Sit Back…
Get Hammered!


Once you write our your fun saying, slide your happer onto the next of your bottle of wine and your gift is complete! Here is how it will look from the front and back.

I love how the gift turned out!
*Just a note*
This gift is only intended for people of legal age and it suppose to be humorous. Please drink gift responsibly!
What Do You Think? Comment below with your thoughts and comments!
-Abbey-
FEATURED SALES


