Top 10 Home Halloween DIY Craft Decorations

Did you know that Halloween is the fourth most popular holiday, according to Forbes.com? Consumers spend an average of 1.96 billion dollars on décor for Halloween, and that doesn’t include greeting cards or candy! Here are some ways to save some money on your seasonal decorating with a few DIY ideas for your home this Halloween season. We have put together 10 easy Halloween DIY project ideas & decorations right here for you!
1) DIY Carved Pumpkin with Bats
Do something different this Halloween, without having to carve the inside of a pumpkin! Instead, carve the outside of a pumpkin and adorn it with festive shapes, like bats! Simply take card-stock or vinyl and use a die cutting machine to cut out bat shapes (you can always cut these out by hand too. Simple shapes like witch hats, or pumpkins could be an easier alternative to the bats if you only using a pair of scissors.) Next, hot glue the bats on the carved pumpkin, as shown in the picture. This unique and creative Halloween project is great for home décor, or maybe to enter in that pumpkin carving contest you’ve been meaning to enter!

2) Halloween Sweets & Treats Banner Jar Décor
Take one, and pass it on! This jar décor is fun & inexpensive to make! This Halloween season pass out creative Halloween banners instead of treats with this DIY project. This would be a great addition to a classroom as well. You can use Halloween paper crafts, embellishments, stickers, and stamps to create your own messages and adhere onto a wooden dowel! These banners are fun to hand out during Halloween parties or as an alternative to candy for trick or treaters.

3) Fabric and Flowers Pumpkins
Pumpkins come in all shapes and sizes, so why shouldn’t you try something a little different with your decorating? Try a pumpkin decoration, without the carving mess! Get a pumpkin and start adding embellishments, like fabric, flowers, buttons, ribbons, doilies, or even pushpins! Think outside the box when coming up with a design for your Halloween décor, and you might be surprised with what you could come up with.

4) Frightful Ribbon Halloween Card
Share the Halloween season with others by sending your own uniquely designed, handmade cards! If you have a lot of people to send cards to, keep your design simple by layering and pasting patterned paper crafts on top of each other. Replicate this for multiple cards, and if you need to make them different, alternate papers. Next, you can stamp a Halloween message on all the cards. Finally, add on a spider sticker, or a ribbon or two, to top off your design and you’re ready to go!

5) Beautiful Pumpkins In Glitter & Glam
Try giving your home a sophisticated and sparkly look with these glitter pumpkins. These are perfect centerpieces to set on your kitchen table or on the sides of your porch. Simply take a pumpkin or a cardboard Papier-mâché pumpkin, and cover the surface of the pumpkin with a white or clear liquid adhesive. You can use a brush to paint it on, or use a spray adhesive. Before the glue dries, pour glitter over the glue. Make sure to have a large piece of paper or mat under your work space to catch all the falling glitter! Try out different techniques like only putting glitter on the bottom half of your pumpkin or making a chevron design with your glue before you put the glitter on. You can also paint the stem of your pumpkin after the glitter has dried for about an hour.

We found this awesome image over at: http://www.trendhunter.com/trends/glitter-pumpkins
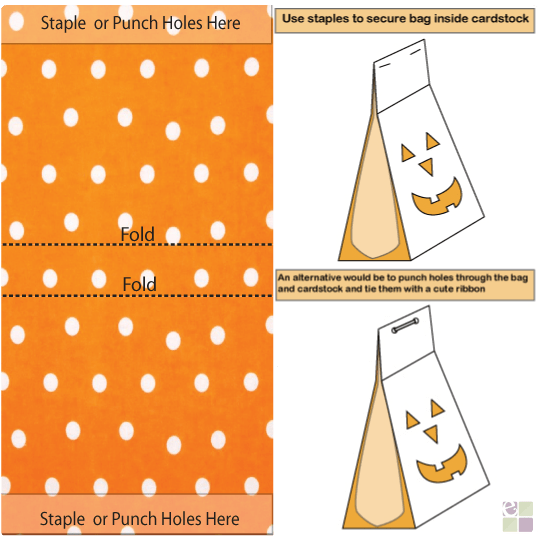
6) Kids Halloween Classroom Candy Treat Bag
Add onto your child’s excitement with fun Halloween crafts & more DIY projects like this easy-to-make pumpkin treat classroom bag! First grab those plastic sandwich bags that you know you have in the cupboard and fill with your favorite candy, making sure to leave enough room at the top to seal and place inside of paper. Take a large piece of card stock and fold two lines as shown. Next, cut out that fun pumpkin face on one side of the card stock. Place the bag of candy inside the card stock, centering it within the folded lines. Fold the side up to meet each other, and staple the top of the paper to hold the bag inside the card stock. An alternative would be to punch holes in the top and tie a ribbon through. If you’re looking to make a project in bulk, these treat bags are easy-to-make with simple tools and supplies! These make for great gifts for loved ones, teachers & parents!


7) Happy Pumpkin Family
A happy pumpkin family makes a perfect decoration for any home! This is a fun and exciting activity for kids & families altogether. Get creative and decorate the pumpkins using embellishments, likes ribbons, buttons, cloth, felt, and even glitter! First, cut off the stem of the base pumpkin, and place the second pumpkin (which will be the head) on top. After you have the position of the pumpkins, hot glue the two pumpkins together and you have a pumpkin buddy!

These are so cute, check them out at: http://www.allyou.com/budget-home/crafts/pumpkin-family.
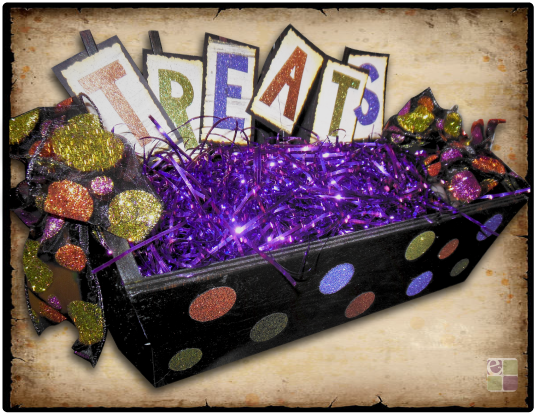
8) DIY Glitter Paint Trick-or-Treat Candy Container
Here is a Halloween version of an Easter basket. This sparkling, glittery box will catch your eye and create a perfect place to store your Halloween treats. Find a rectangular box and paint it black, or any color you choose. Decorate it with colorful glitter stickers. Next, make up a sign using reflective glitter alphabet letters placed on cardstock (http://www.craft-e-corner.com/mambi-large-alphabet-stickers-8-sheets-7-x12-silver-glitter.html) spellin out “Treats” for the little ones! Lasty, cover the bottom of the box with basket filler or confetti, and pour in your Halloween candy on top.

9) Pumpkin Twirled in Ribbons & Sparkles
If painting & coloring isn’t your forte, you can also use patterned ribbons to create a pumpkin that will keep for years to come! Buy yourself a a Papier-mâché pumpkin, and a few different spools of ribbon, and you will have a pumpkin that saves you time, creates no mess, and won’t have to be thrown out after the season. Make sure to get some adhesive and a pair of scissors before starting this project. Use the ribbons to wrap and decorate the whole pumpkin. Get creative with how you use the ribbon. Try a lattice or horizontal wrapping technique. This piece of artwork is fun and easy to do, without spending a lot of time or money!

10) Stack-able Pumpkin Craft
Whether you have too many pumpkins on your hands this Halloween, or you want to stack up on your artistic skills, this DIY project is fun and unique to work on! If considering this pumpkin project, if you decide to use real pumpkins, consider the weight of each pumpkin, and also how you will stack them so that they will remain secure. You will have to use wooden dowels to help with the stacking, and they come in different sizes. Remember, instead of a real pumpkin, you can also use a paper mache pumpkin that can be easily painted, glued & designed. The example used a variety of decorating techniques from painting to fabric to embellishments. Mix up different pumpkin designs and stack them all up into one main attraction! (link to paper mache) http://www.craft-e-corner.com/crafts-1/craft-supplies/paper-mache.html

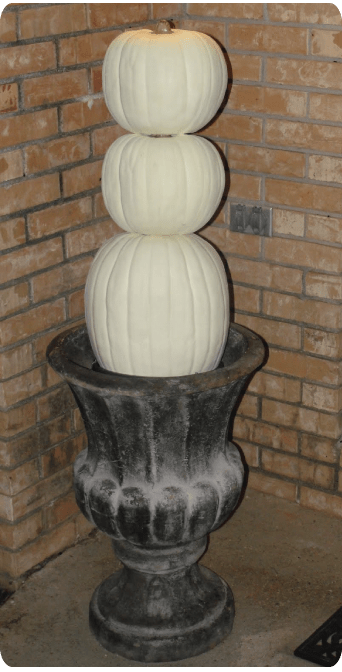
This is a great tutorial for a very simple, yet elegant pumpkin topiary over at http://imperfectlybeautifulms.blogspot.com/2009/09/sneak-peek.html
We hope these Halloween DIY decorations were helpful in your quest to find Halloween craft ideas ! We can’t wait for you to share your decorations with us. Don’t forget that you can stock up on all your crafting supplies at Craft-e-Corner.com!
Share your seasonal décor ideas below! Let us know what your favorite Halloween craft is!

FEATURED SALES