DIY Canvas Bag Using Iron-On and an EasyPress

I think Iron-On/HTV makes everything better, wouldn’t you agree? Whether you want to personalize something for yourself or for a gift, the possibilities are endless. I recently received an EasyPress, so I thought that this would be the perfect opportunity to not only try out Cricut’s Iron-On, but also the EasyPress for the first time! I had a canvas/muslin reusable bag that was blank so I thought I would jazz it up on there. I found a design in Cricut Access that says “Fresh Flower Market”. I thought it would be the perfect fit since I love using these bags for grocery shopping, especially at Farmer’s Markets in the summer!
Materials Needed:
- Cricut Maker or Cricut Explore Air 2 (or any machine that can cut Iron-On/HTV)
- Cricut Iron-On
- Cutting Mat: either StandardGrip or LightGrip
- Canvas/Muslin Bag
-
To get started, you’ll want to create your design or find one in Cricut Access. I love Cricut Access because it saves me SO much time in making designs. Sometimes I like to make my own, but it can be pretty time consuming – so I like to use Cricut Access when I can. The number for this design is #MB5002CA.

2. Next up, click “Make It”. When you’re on this screen, you’ll want to make sure that your design is mirror-ed, so that when you cut it, it’s actually backwards. I have circled on the screenshot below where to click. Once you’ve done that, put your cutting settings on Iron-On. 
3. Now put your Iron-On onto the mat. I like to use the Standard Grip mat (green) or Light Grip mat (blue) for Iron-On. This next part is so important, so don’t miss it: you have to put the Iron-On FACE down! For example. if you are cutting red iron-on, put the red side down. Use a scraper or credit card to really push it down onto the mat. For me, I’m using purple iron-on – so I put the shiny purple face down. Hopefully the picture helps! If you’re new to Iron-On like I was when I made this project, you might be thinking, “You have to mirror the image AND put the vinyl on backwards?” At least, that’s what I thought  but the answer is: YES. Just trust me.
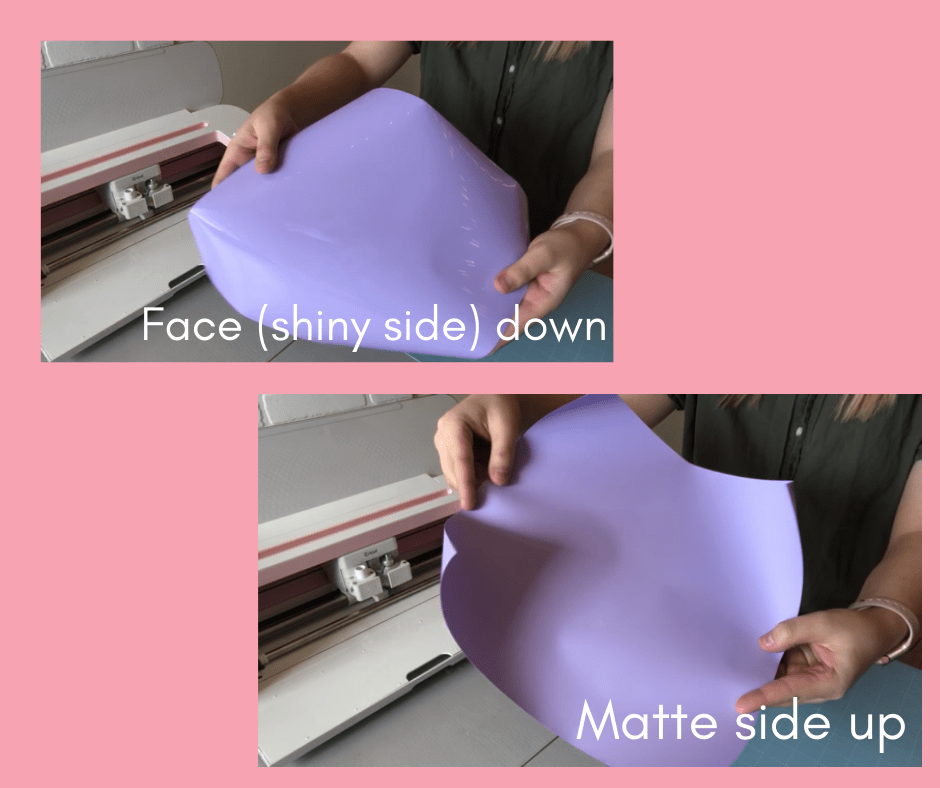
4. Once it’s finished cutting, peel the Iron-On off of the mat and start weeding. Remember, you’re weeding the Iron-On and not the protective clear sheet. TIP: I like to bend my mat backwards (see below) instead of the Iron-On to prevent the Iron-On from getting bent or kinked. 
5. Once you’re done weeding, it’s time to get our canvas bag ready for the Iron-On! In order to figure out what to put your EasyPress settings at, you can head to https://home.cricut.com/easypress-heat-settings-guide to figure out the exact settings! For this project, Cricut recommends: Temperature at 340F, preheating for 5 seconds, applying heat and gentle pressure for 30 seconds, flipping the material and pressing for 15 seconds and then peeling off warm. It’s so important to follow these instructions exactly! My design was too large for my EasyPress, so I just worked in chunks. Another tip – as you’re peeling, go slowly and if anything didn’t fully adhere to the bag, go back over it with your EasyPress for another 30 seconds.

That’s it! I also did the other side of my bag, so that one design is pink and one is purple but they have the same design. To be honest, I was really intimidated to do this project for the first time. I had never used Iron-On or the EasyPress before, so I was a little nervous. But hey, if I can do it – I know that you can too! Let us know if you give it a try!

-Courteney
Cricut Infusible Ink Tutorial: Custom Cosmetic Bag
FEATURED SALES