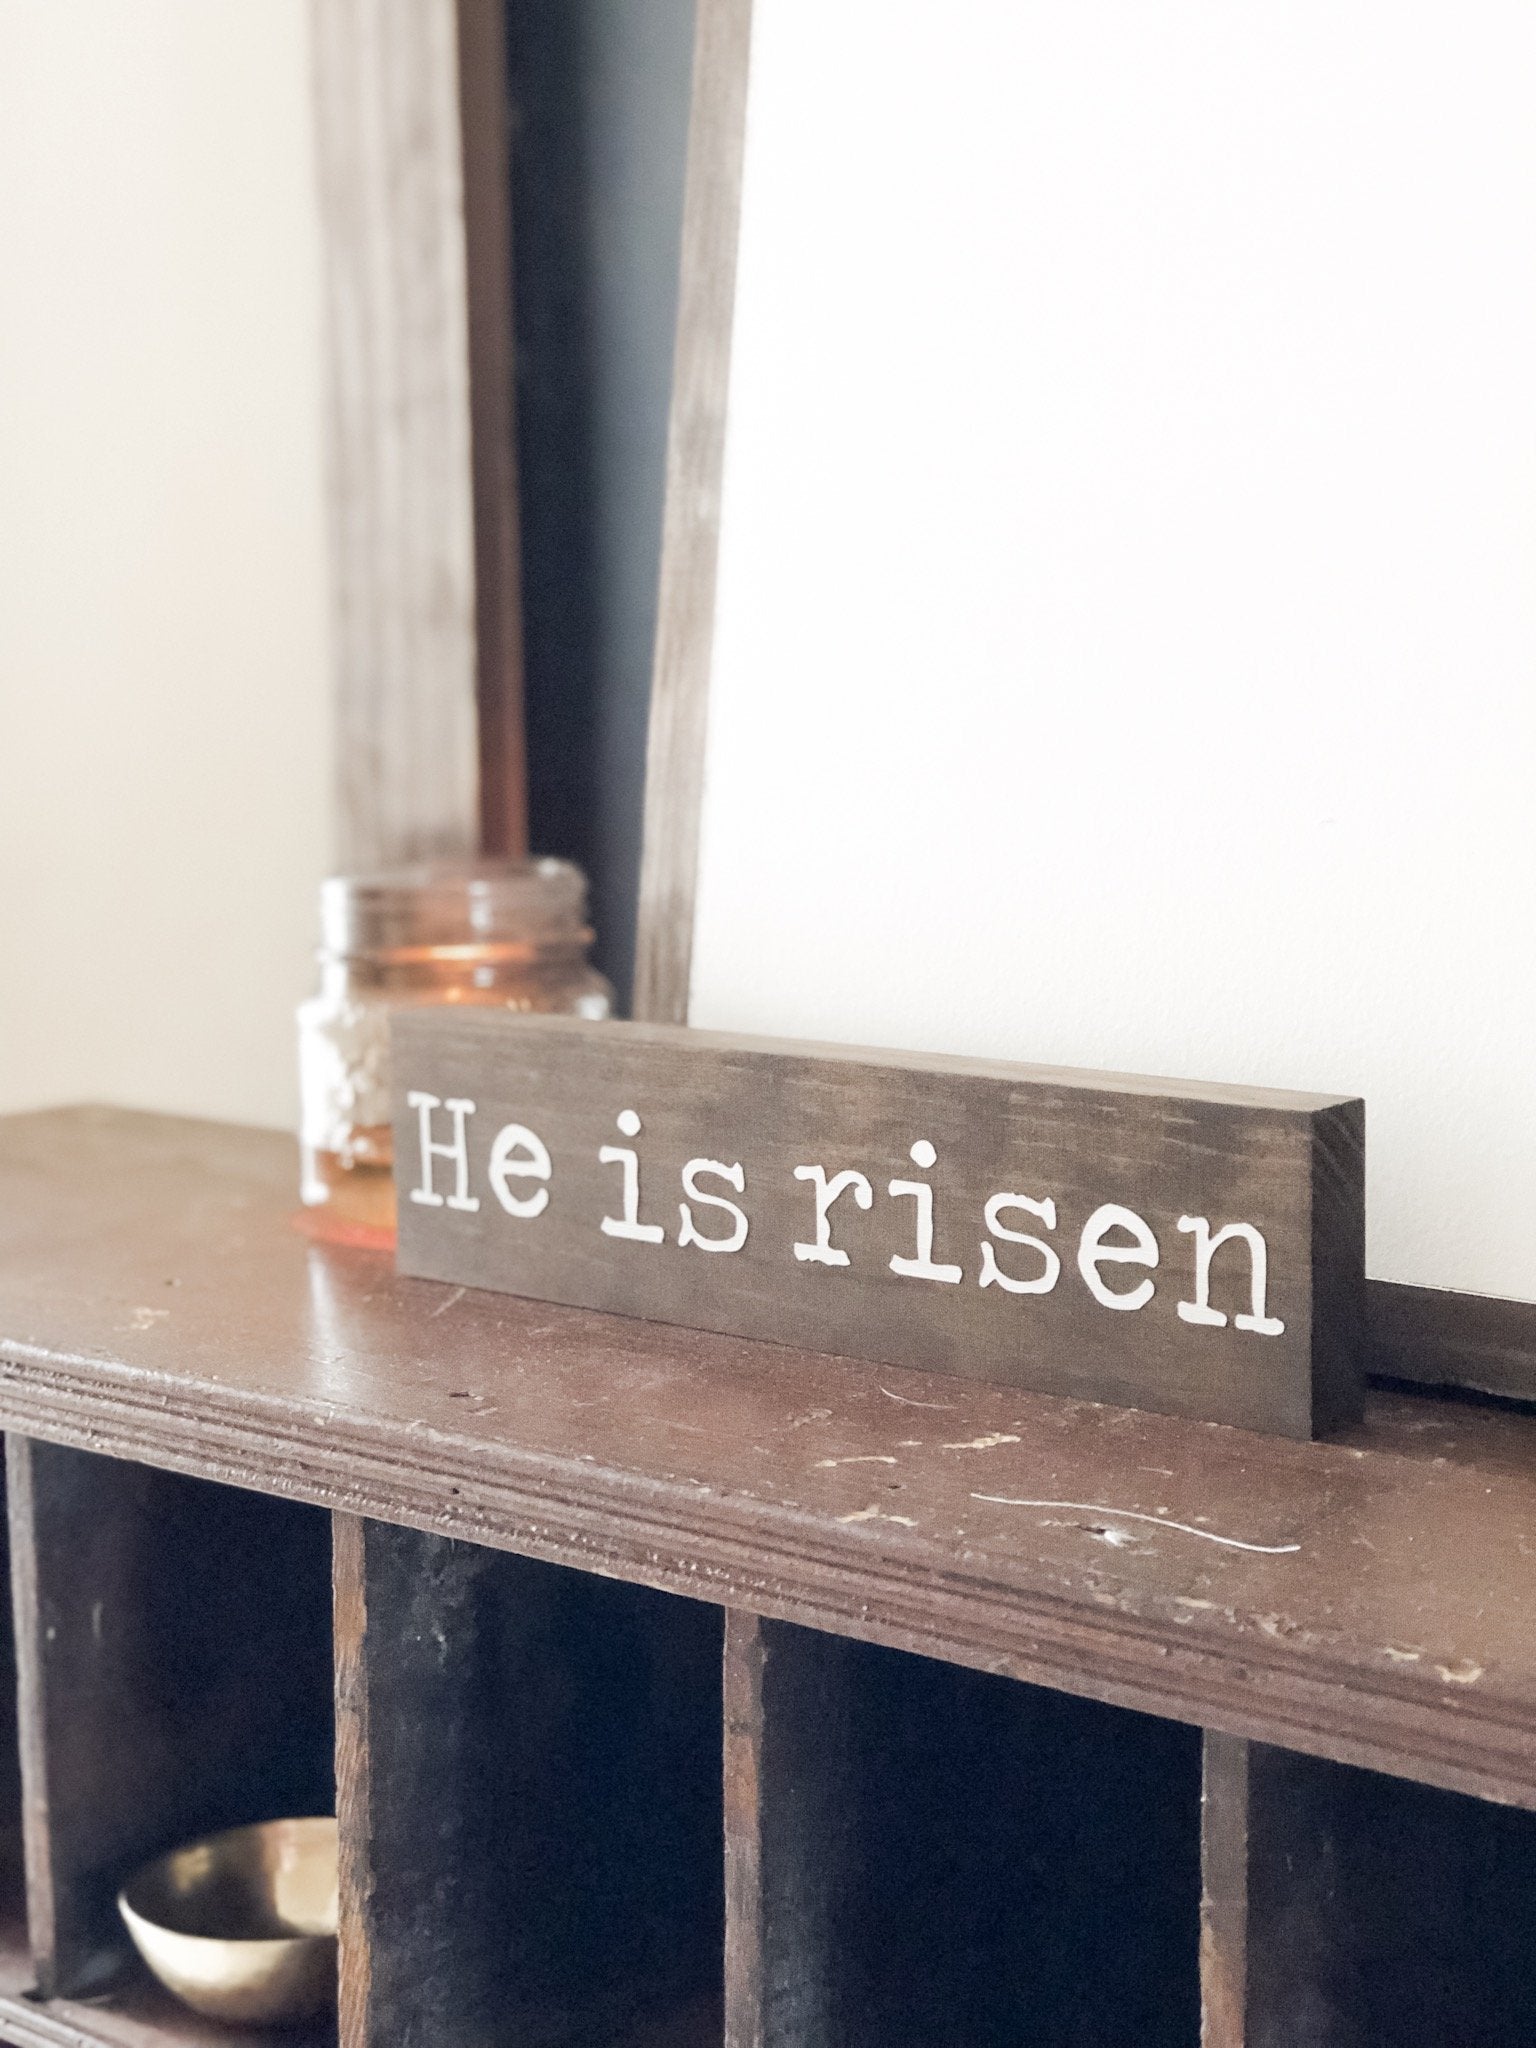
DIY Easter Wood Sign
 Easter is one of my favorite times of the year! I love celebrating the resurrection of Jesus and spending time with my family and friends. I also love decorating my home – it’s actually one of my favorite things to do. I especially love decorating my home when it’s with something that I’ve made! So today, I’m showing you how to make a mini Easter sign. If you’ve been wanting to get into sign making, this is a great one to start with since it’s so simple.
Materials:
- 1×4 pine board, or any scrap wood
- Stain (I used Dark Walnut from Varathane)
- White paint
- Premium Vinyl
- Transfer Tape
- Mod Podge
- Weeder Tool
- XL Scraper
- Paintbrush
- Cricut (any machine that can cut vinyl)
To get started, you’re going to need a piece of wood to paint your sign on. I used a 1×4 pine board I found in our garage and cut it down to 10″ long. You can use any kind of board or piece of wood that you find. Just make sure that the surface is smooth, otherwise you will have a hard time applying your vinyl and getting it to stick to the board. Then stain your board. I used Dark Walnut stain from Varathane. This is my favorite stain! I applied the stain with an old rag and the wiped off any excess stain. Remember, this is an oil-based stain so it will ruin anything else it touches. Make sure to wear gloves! Also, make sure that your stain does NOT have polyurethane in it, otherwise the paint will not stick. I also would stain outside if you can – it’s pretty stinky. Once you’re done with getting your wood ready, give it at least 24 hours to dry.
Make your design and cut your vinyl with your Cricut. I am using Premium Vinyl from Cricut. Did you know they have recently changed their vinyl? I used to not be a huge fan, but I’m definitely a big fan now! It lays flat and weeds without any effort!

Once you’re done cutting, weed your stencil. I’m using my Weeder Tool which makes this a BREEZE. If you do not have one yet, you should add that to your shopping list! It’s amazing.

Once the weeding is done, use Transfer Tape to transfer your design onto the wood. If you haven’t done this before, you will put your vinyl stencil face down onto the sticky side of the transfer tape. Once it’s completely onto the transfer tape, slowly peek back the paper backing on the vinyl so that the vinyl is completely transferred onto the transfer tape. It sounds really complicated, but I promise it’s a simple concept. Just go slow so you don’t tear anything and you get all the inside of the letters, like “e”!
 Now we are going to apply the vinyl to the wood using the transfer tape. Line up your stencil with where you want it to go and then use your XL Scraper to push the vinyl down and get out any air bubbles. Once you feel like it’s completely adhered, slowly peel back the transfer tape. The vinyl will stay on the sign, but I like to use my XL Scraper to push the vinyl down (if any parts of it start to come up) as I’m peeling back the transfer tape too.
 Once it’s completely adhered, apply a coat of Mod Podge over the stencil. Yep, you heard me! Before you put any paint down, Mod Podge goes down first. Just trust me
  what happens is that this will seal the stencil to prevent any paint bleeding through. It’s magic!
Once the Mod Podge has completely dried (it should only take a few minutes, but if you put it on super thick it could take longer), it’s time to paint. I usually do 2-3 coats of paint, but it depends how thick your paint is. I like to go a little lighter on the first coat of paint. Just make sure that between coats, you’re letting it completely dry. Once it’s completely dry, slowly peel off the stencil. Then go back with your weeder and remove any leftover parts that are still stuck and the inside of the letters like “e”. And that’s it!
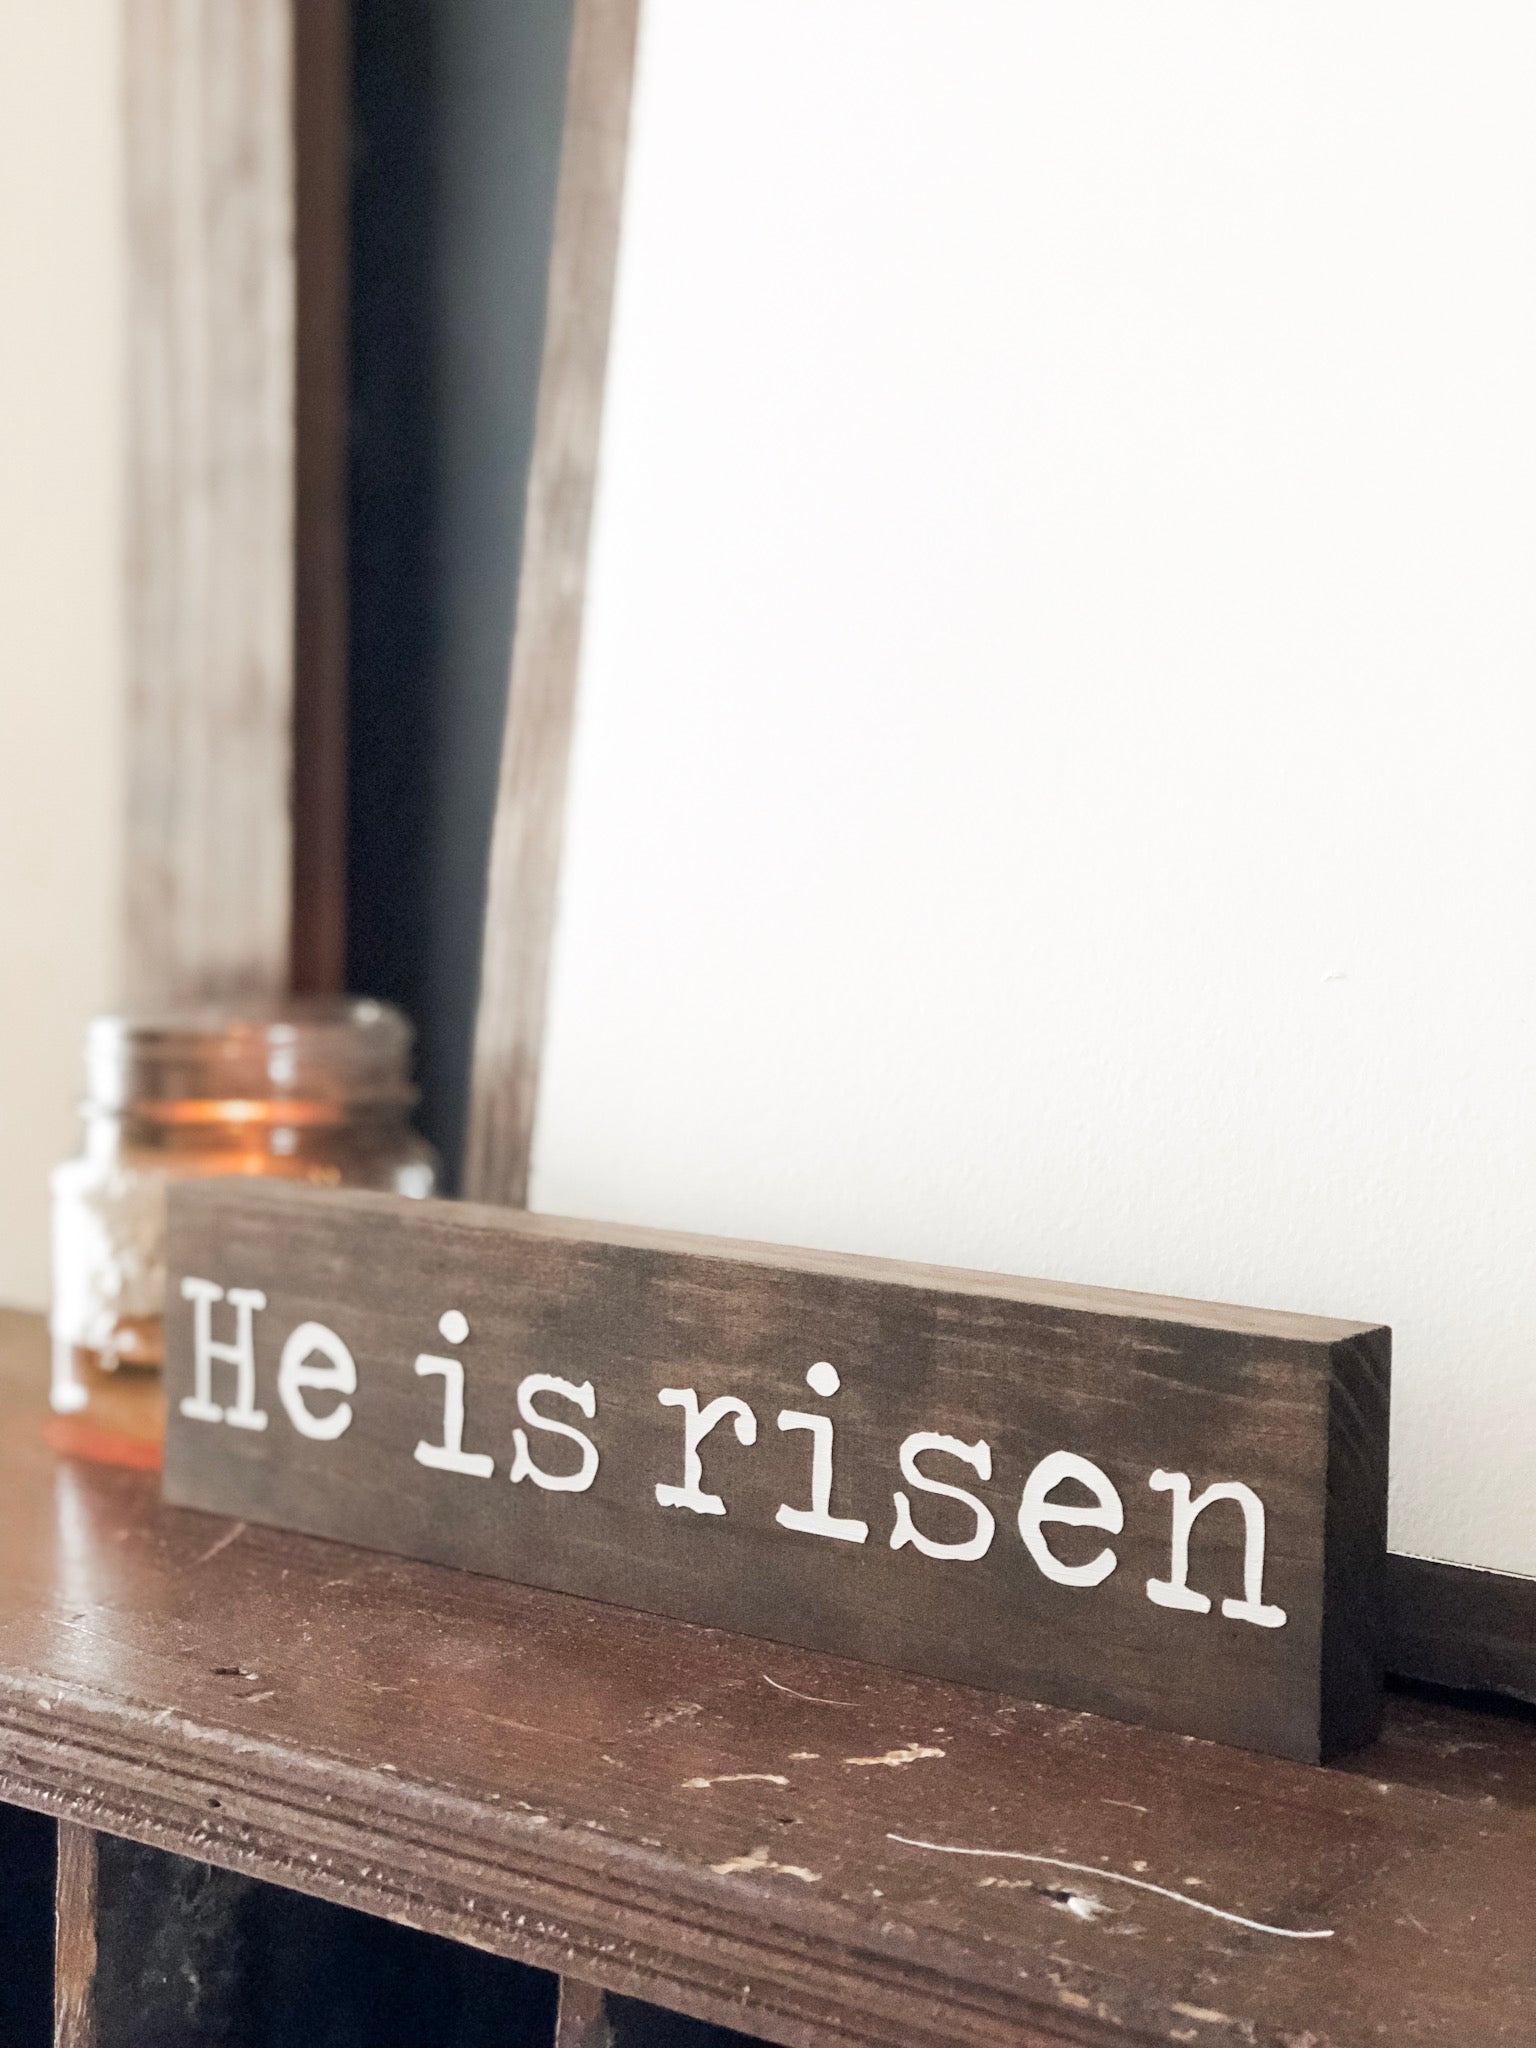 Signs are one of my FAVORITE things to make! I love this method because it always comes out super crisp + clean. Thanks for reading!
-Courteney
Fabric Bunny Dolls: Whimsical Painted Easter Decor
FEATURED SALES