All That Glitters! Double Sided Adhesive Glittered Easter Egg Sucess!
As you all might know…I am a glitter addict and love anything that shines, so when it came to making Easter eggs this year, glitter seemed to be a natural fit! GLITTER EGGS!
(I get excited even typing it!)

At this winter’s CHA show, Silhouette released a new Double Sided Adhesive Starter Kit including all the bells and whistles to making fabulous glitter projects. I didn’t use everything in the kit, but I did have some of the same Silhouette Double Sided Adhesive Sheets from a previous project so I thought I would give it a whirl!

Using my Cricut Expression 2 Machine, I chose a few simple butterfly images from the Cricut Accent Essentials Cartridge as well as a more detailed image as well. The great part about this project is that you don’t need a die cutting machine! Use a good ol’ pair of scissors or a sturdy paper punch and cut out designs too!

So of course doing this for the first time I ran into many bumps along the way! Such as….the really detailed design? Yep, that was a FAIL! Here are a few great tips to getting a great cut the FIRST time…

-
Make sure to cut with the sticker side up, which I think is the yellow side. (I did it wrong at first)
-
Use the deepest setting for your blade depth on your cutting machine and have it cut twice just to make sure you get that clean cut all the way through.
-
Keep your images simple and not too detailed.
-
Keep the size as small as possible. If you haven’t noticed an egg is a very small and not-so-flat surface, haha. Not really ideal for large detailed images. The smaller and more simple – the better!
* The paper had 3 layers to it so doing these steps will insure a clean cut*

Another great tip: Let your eggs sit out before you do this project. I pulled them straight from the fridge and they were perspiring and very cold, hence the adhesive NOT sticking very well!
On my second attempt, I followed all of these great tips I am giving you along the way, including letting the eggs sit out, and it worked great!

Since the adhesive was not sticking to the cold egg I had to peel it off by hand. For a nail biter (I know! It’s a terrible habit!) like me, this was not an easy feat. If you lightly slick just a tiny bit of the ‘sticker’ to a piece of paper it helps hold it making it easier to peel!

To glitter my egg I just sprinkled the color(s) of choice on a piece of scrap computer paper and rolled my egg onto the glitter. I did this on my craft room floor because, as we all know, glitter is messy! I used Ranger Stikles Fine Dry Glitter which is my all time favorite glitter and has SO MUCH SHINE!
Use a soft bristle paint brush and lightly dust off the access glitter around your image into the garbage (or back into your glitter container).

Here is the more detailed butterfly from my first attempt at this project. Not too shabby! I used a Sharpe marker to add some details around my design.
When your egg is completely finished, spray a light coat of hairspray or sealer over it to seal the glitter and prevent the glitter from getting on everything!
(P.S. I do NOT recommend eating these eggs later!)

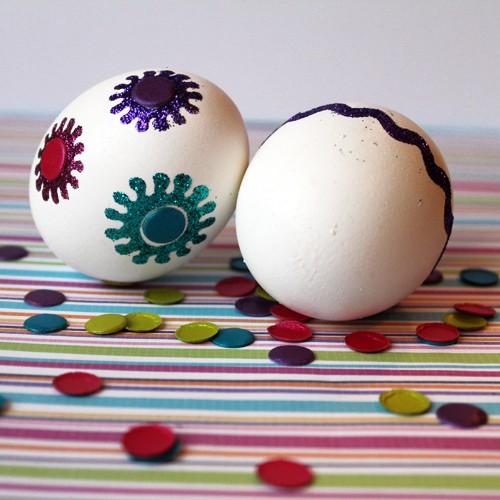
…and here are my second attempt eggs! MUCH BETTER! A total success! For this egg I put on each shape one at a time and glittered them separately so my glitter would not mix.

I loved how it looked but had the PERFECT colors of Candi Dot Embellishments that made the perfect centers to my glittered sunbursts! I love having a bag or two of these Candi Dots around at all time!

Here is a shot of my finished eggs.
The project overall was not too bad. I did learn a whole lot of what NOT to do the first time around, but after improving my process it was EASY! A bit time consuming…yes. Worth it though? YES!
I do not recommend this project for really little kids. It’s a pretty detailed and messy, but if you have a middle aged child that has persistence and patience, these would be great. Polka dots would be a pretty simple and fun design for the kiddos.

Hope you LOVED the project and I am glad I could share all of my learning tips along the way. Isn’t is great having bloggers and crafters like us to do these project first and perfect them for you? You’re very welcome! (haha)
WHAT DO YOU THINK?
Please don’t be shy to comment I do truly LOVE seeing your comments and hearing your thoughts!

