
DIY Tea Towel with Cricut and EasyPress2
 Iron-On Vinyl is taking over my house and I’m totally okay with it! I’ve been making a lot of projects with Iron-On lately, like this Wood Sign, Canvas Tote Bag, and Felt Banner. Today I am going to add it to a Tea Towel. Using the Cricut EasyPress2 and Everyday Iron-On Vinyl, I was able to complete this project in about 15-20 minutes. Let me show you how!
Materials:
- Tea Towel
- Cricut Maker (or any machine that can cut Iron-On)
- Cricut Everyday Iron-On Vinyl
- Cricut EasyPress2
- Cricut EasyPress Mat (optional – you can use a towel instead)
- Cricut XL Scraper
- StandardGrip Mat
- Cricut Weeder Tool
The first step is going to be to apply your Iron-On on a StandardGrip cutting mat and then hit cut. Make sure your image is mirrored in Design Space and that you put your Iron-On face down on the mat. Then we are going to weed our design. This just means removing all the excess vinyl around the letters and inside of the letters. I love using a weeder tool for this – it makes it a breeze.
 Once you’re done weeding, then we are going to transfer the design to our tea towel. To do this, I am using the Cricut EasyPress2 along with a Cricut EasyPress mat. If you don’t have a mat, you can use a towel.
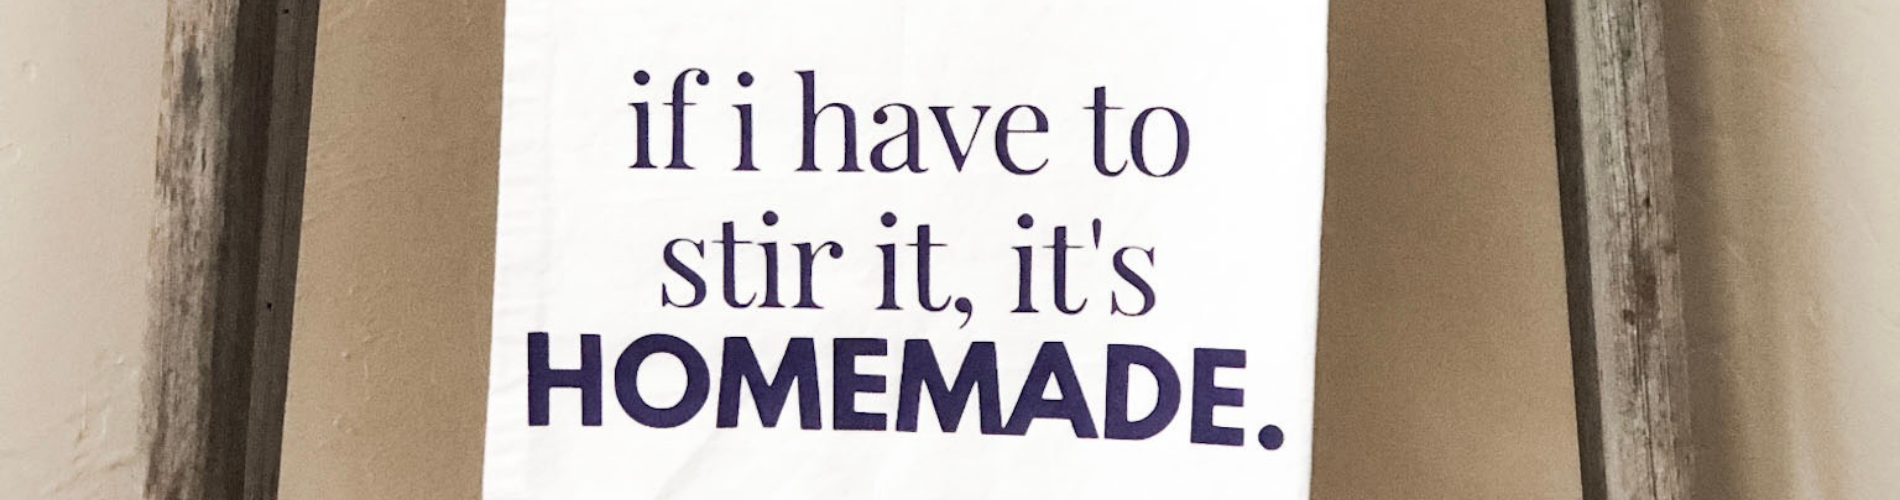
Tip: To find the center of your towel, fold your towel in half and then in half again. Then while your EasyPress2 is heating up, press for 5 seconds along the crease. Then when you unfold it, you’ll know exactly where the middle is for you to place your Iron-On. Next, place your Iron-On on your towel. Make sure it is straight and centered (this is where the line you creased comes in real handy!). Can you see it in the picture below?
 Then we are going to press our towel with the EasyPress2. For my EasyPress settings, I found them on Cricut’s website in their EasyPress Heat Transfer Guide. They are as follows:
- Set temperature to 340F
- Preheat for 5 seconds
- Apply heat and gentle pressure for 30 seconds
- Flip material and press for 15 seconds
- Peel off warm
I followed these instructions to a T and got perfect results. It’s so important that you don’t miss a step. Before this project, I made a different tea towel and forgot to preheat my towel and also flip the material and heat it on the back. Then when I went to peel, I was having a really hard time because the Iron-On hadn’t fully adhered to the towel. I knew that for my second towel (the one I’m sharing about now) that I needed to follow the instructions exactly how they were laid out. No surprise here, but I did and had no problems when it came to peeling off the backing on the iron-on. Let this be a lesson learned…never miss a step! There is one last thing that I like to do once I’ve peeled off the backing. This isn’t recommended by Cricut, but is more of a personal preference. I like to take my EasyPress2 and just press for a couple seconds one last time. Even though you have already peeled the backing off, I just set it on top of the Iron-On and press for a couple more seconds. You don’t need to do this, but I just like to finish this way.
 And that’s it! I learned a lot from this project – namely being, make sure that you follow all of the EasyPress instructions! I truly couldn’t believe how effortless it was to work with the Iron-On and EasyPress when I actually followed the instructions. Go figure.
If you were to make a towel for your kitchen, what would you want it to say?
-Courteney


Kitchen Refresh: New Valance using Cricut Iron-On
FEATURED SALES


2 comments
I have same question as Meg… how does it wash?
How well do these hold up to washing and drying?